
“By the time you are saying nice to meet you, I’ve already known you for months.” Creepy….am I right? This line from Julie Clark’s novel stayed with me through the whole book. In today’s times where information is so easily obtained by anyone who wants to take the time to do so….well, it just hit home! The first book I have rated 5 out of 5 in a long time….find out why in my book review of The Lies I Tell.
Meg Williams has been in hiding for 10 years. In that time she had numerous other identities…Deidra, Sandy, Amelia, Margaret, Melody & Maggie. The list goes on. Why so many identities? Exactly how does she pull all of them so successfully? While we don’t get to know all of those other pseudonyms intimately, we do learn a lot about why Meg has decided to come out of hiding after 10 long years!
Month: March 2023

Many days I am happy that I recently discovered my dairy sensitivity because it has made me explore new foods that I have never cooked with before. White rice, brown rice, wild rice, and different forms of pasta noodles were our staples before now. These have been basically replaced with couscous, farro and quinoa. Mediterranean Couscous/Farro salad is a perfect example!
Although couscous looks like a grain, it is technically a pasta made from semolina. There are three types of couscous and I cook with the Lebanese form which is the largest in size and is often called pearl couscous. It does take longer to cook but is worth the wait. Farro is an extremely nutritious grain. It is a much healthier alternative to rice.
Mediterranean Couscous/Farro Salad ~
One only has to type Mediterranean Couscous Salad into the Pinterest search line and you will get numerous versions of this recipe. I added a link in one of my posts recently that took you to one of the recipes I tried and loved ➡️➡️Surviving a Dairy Free Life – With Recipes! Since first trying some of these recipes, I have tweeked them a bit to come up with something a bit different.
The basic ingredients are typically the same in most recipes you see. One of the biggest differences is that I mixed couscous and farro in the same dish. What is awesome about making Mediterranean Couscous/Farro Salad is you can add in items you may need to use up from your fridge and it’s still amazing. The dressing you use is basically what makes the biggest difference in my opinion!
Ingredients ~
- Pearl Couscous – 1 1/2 cups
- Farro – 1 to 1 1/2 cups
- Garlic – minced – 2 to 3 cloves
- Chicken or Vegetable Broth – 32 ounce
- Bell Pepper – Orange, Red, Green and/or Yellow – diced -I used only 1 orange bell pepper
- Onion – Red and White – diced- 1/2 each of medium sized onion
- Tomatoes – diced (whatever is in season – Cherry, Roma, Campari, Plum, etc) – 1 1/2 cups
- Banana or Poblano Pepper – diced – 1 pepper
- Black Beans (or beans of choice) – 1 can
- Basil – to taste (I used about 3 tsp)
- Salt & Pepper – to taste
- Green Onions – dehydrated or fresh – chopped – 1/2 cup fresh or 2 Tbsp dehydrated
- Tbsp. Olive Oil – divided – 4 Tbsp + 1/4 cup
- Lemon Juice – 2 tsp. or 1 lemon juiced
- Red Wine Vinegar – 2 Tbsp
- Scallion Oil – 1 Tbsp.
- Feta Cheese – For those who are NOT dairy free like my husband 😜
Instructions ~
Heat 4 Tbsp. olive oil in pan.
Add garlic and onion. Cook on medium-low heat until translucent. (A good garlic press is so important to have in the kitchen….I personally love the ones with the built in cleaner to help get all the bitty pieces out!)

KITEXPERT Garlic Press, Premium Garlic Mincer with Ergonomic Grip Handle, Professional Garlic Presser Crusher and Peeler Set, Sturdy Ginger Press for Nuts & Seeds, Easy to Clean and Dishwasher Saf...
Buy Now
This site contains product affiliate links for Amazon and other companies. I may receive a commission if you make a purchase after clicking on one of these links. Thank you for supporting my small business!
Toss in couscous and farro. Cook until browned (about 5 minutes).
Add chicken/vegetable broth. Start with half of the 32 ounce container. Bring to a boil. Reduce to medium/low heat. Add broth as needed to keep the couscous and farro moist.

Remove from heat and let cool.
In separate bowl, add bell pepper, tomatoes, poblano pepper, black beens, green onions, basil salt and pepper.

Mix veggies with cooled couscous/farro mixture.
Whisk together remaining olive oil, lemon juice, red wine vinegar and scallion oil. Add in a bit of extra basil, salt and pepper. I love using a salad dressing shaker when making all of my dressings. Toss the ingredients into the dispenser, make sure top is closed and shake until mixed. Then move the top piece over to pour. Such a great tool from countertop creating to kitchen table. In fact, many times I leave a dressing “undressed” and let everyone top their own according to their preference.

Salad Dressing Shaker For Mixing Ranch And Sauce, One Hand, Leak Proof, Spout Lid for Pouring And Measurement Marks With Good Grip Rubber, Italian Dressing Shaker, And Oil And Vinegar Dispenser - 12oz
Buy Now
This site contains product affiliate links for Amazon and other companies. I may receive a commission if you make a purchase after clicking on one of these links. Thank you for supporting my small business!
As stated above, you can add in so many different ingredients according to taste or just what you need to use up in your fridge. I do always try to add some type of pepper in addition to the bell and green pepper. The poblano is one of my favorites because it doesn’t pack a lot of heat but still gives some great additional flavor. However, I do use other spicier peppers at times too because my husband prefers a lot of spice!
I would like to also note that it is very common to use chick peas in this recipe, which are very good. I had to make a change due to food allergies. What I have found when making the Mediterranean Couscous/Farro Salad is that many different “beans” are good in this recipe so choose your favorite and enjoy!
Pairings ~
This salad is awesome when paired with grilled salmon! However, it is truly a great accompaniment to almost any main dish…or honestly it is great served as the main dish as well! I love making it for dinner and then using the leftovers for lunch….meal prep at it’s finest!
Have you tried this recipe? Let me know in the comments below! I look forward to hearing from you!
P.S. Are you looking for some other fresh recipes? Check out my delicious stir fry chicken and vegetable recipe here!
Happy Cooking ~
Mimi

Letty Carahan has found her sister, Tanya, dead and is now on the run. Making things more interesting is that she has “abducted” her neice, Maya, as well. Did she actually find her dead or is SHE the murderer as Tanya’s ex is claiming? As the story unfolds, we are left to decide who the actual murderer is. See what you think as you follow along in The Newcomer – A Book Review.
The Newcomer is the 28th book that Mary Kay Andrews has authored but the 18th under this pen name. Her pen name was inspired by the names of her children. The change in name also found her writing in a different style as well, which found her hitting the New York Times bestselling author list! Prior to this, she has written 10 mystery books under her real name, Kathy Hogan Trocheck.
Continue reading
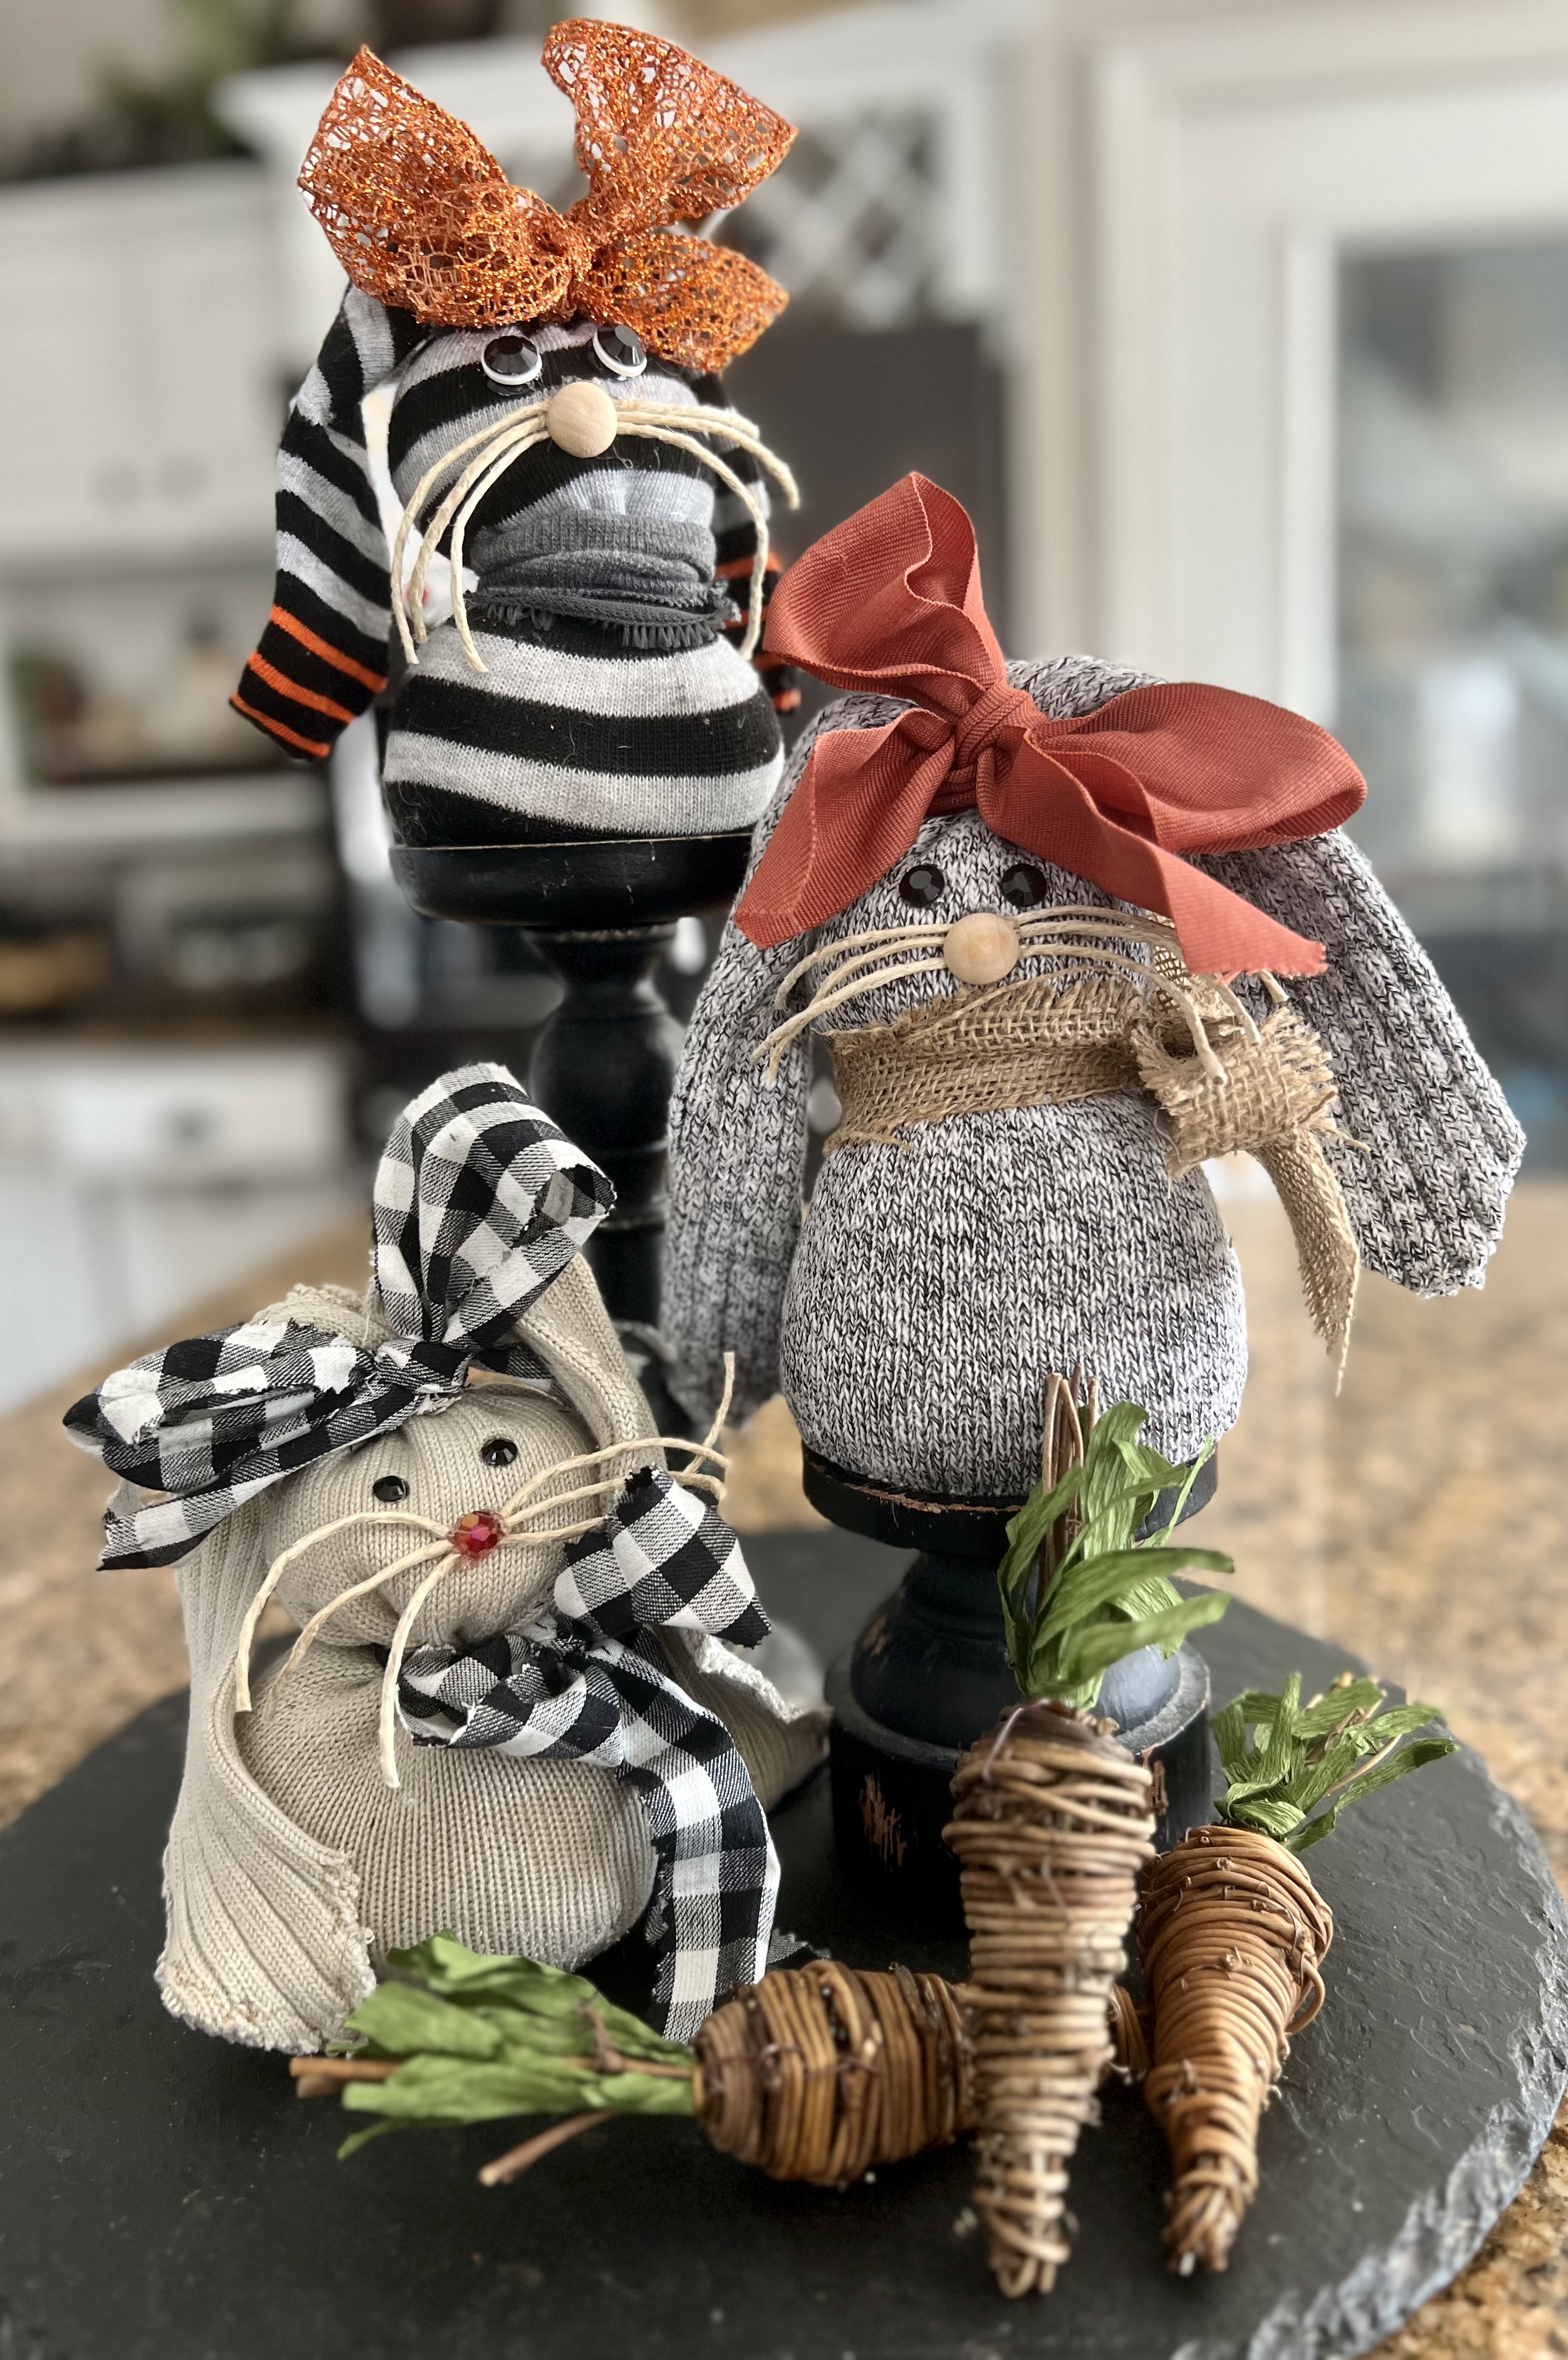
It’s time for a little spring crafting and these adorable DIY sock bunnies are a perfect project to get you started! This is one of those crafts that you probably have most (if not all) of the items needed laying around your house! Another craft that you can get creative with on the embellishments. Let’s have some bunny crafting fun!
You may remember that I am part of a monthly Sustainable Craft Challenge with several other very crafty women. Julie Nyano gives us a theme to work with each month and we need to use at least one element that is sustainable/eco friendly. January’s theme was WARM so I crafted a DIY Snowy Luminary and February’s theme was LOVE, and I shared a DIY Valentine Branch Tree with you. This month’s theme is SOFT! Read on to see how to make sock bunnies as well as many other awesome soft crafts!

DON’T Throw Away Those Mismatched Socks!
What do you do with those poor lonely single socks that have lost their mate? When my kids were young we would often make sock puppets or they made a great dusting “glove” for the kiddos. My daughter, Karleigh, would just wear mismatched socks…she went through a period where that was cool! (It drove me bonkers!😜) There are tons of great ideas out there to utilize those old socks that are never going to warm your little toesies again….the DIY sock bunnies are one of those great ideas!
Longer socks will work best for this project but you can complete these with almost any size sock. Keep in mind that the smaller the sock, the smaller your embellishments will need to be and that gets a little tricky (especially if you have chunkier fingers like me!). Once you start making these you will have a hard time stopping!
Items Needed ~
- Sock
- String
- Rice
- Hot Glue Gun & Glue Sticks – or Sewing Items
- Ribbon
- Embellishments
- Scissors
- Pinking Shears (optional)
Making The Body ~
Fill a sock with rice. The amount of rice you will use will vary according to your desired final outcome. Once you fill it about a quarter of the way start pinching where you think you should tie the string to form head and body. If it doesn’t seem quite right, then add (or take away) rice to your liking. Keep in mind that you want to have plenty of leftover at the top of the sock to create floppy ears.

Once you get it filled to your liking, tie some heavy type of string to form the body and then another piece to tie off the top of the head.

It’s Time For Those Bunny Ears ~
Pull the top part of the sock up in the air and cut down the middle of the sock. Find the middle of the sock and start cutting down the middle to form the ears.

Continue cutting all the way down to the top of the head of the sock bunny.

It’s starting to look like a cute little bunny…am I right? Now you need to fold the ears in length longways to create a finished ear. Pull each ear up and round off the top of them.

Now you are ready to adhere the edges. You have two options here:
- hot glue down the edges
- sew down the edges
Hot gluing is obviously the easiest and quickest method. I actually love the finished look of both methods. I did find that when I sewed them it gave the ears a more “ruffly” look. You get to decide what look you like best! Below is the bunny with the sewn ears.

DIY Sock Bunnies Embellishments ~
Now it is time for bows and scarves (or whatever you decide to embellilsh your baby with). I have an assortment of wired ribbon that makes it easy, however, I found that I enjoyed cutting strips of material with my pinking shears too! It is helpful to attach the bows first to see how much “face” space you have left for the eyes, nose and whiskers. There is some trial and error here depending on the size of your sock bunny.

Playing around with some old scrap material can be fun to see what the finished look will be. For me, it was helpful as I discovered that some materials I thought would be great didn’t give me the “look” that I was going for. Trial and error at its finest! You might even want to put some cute little flower bead or fun jewel at the center of the bow.
You can also cut off the cuff of extra socks to create a scarf type look. Cut the entire cuff and then place it around the neck.
The Cute Little Nose & Whiskers ~
The sky is the limit with the objects you can use for the face embellishments. Small wooden half balls came in very handy for the nose. I also love the cute little pink bead for the nose! For those of you who like to work with embroidery floss, it would be easy to do a few quick stitches to make a nose that way as well!
DISCLOSURE: This site contains product affiliate links for Amazon and other companies. We may receive a commission if you make a purchase after clicking on one of these links. Thank you for supporting my small business!

200pcs Half Wood Balls Unfinished Natural Half Ball Split Wood Balls for DIY Projects, Kids Arts and Craft Supplies (12mm)
Buy Now
$5.99
This site contains product affiliate links for Amazon and other companies. I may receive a commission if you make a purchase after clicking on one of these links. Thank you for supporting my small business!
05/04/2026 11:03 pm GMT
Jute or hemp both have a great weight to them that works great for the whiskers. It works best if you hot glue the whiskers first and then add an extra dollop of glue on top of the whiskers to place the nose. It seems to secure the whiskers on much better. A Cherry On Top Crafts is a great place to get new supplies if needed!
What About Those Eyes ~
Small flat back resin round crystal beads became eyes for mine. I played around with buttons too but decided I like the soft shimmer of these resin crystal beads.

AD Beads 1440 Pieces Mixed Size No Hotfix Glue on Quality Glass Flatback Rhinestones Round Crystal Gems (03 Jet Black)
Buy Now
$7.99
This site contains product affiliate links for Amazon and other companies. I may receive a commission if you make a purchase after clicking on one of these links. Thank you for supporting my small business!
05/05/2026 03:03 am GMT
The striped bunny (isn’t she so cute?) ended up with the black stripe right where I needed the eyes to go. I wanted the eyes to stand out more so I glued the black crystals on a white button to make them pop. How does your sweet bunny look?
March Sustainable Craft Challenge ~
![]()
As I mentioned at the beginning of the post, this project is part of a very fun craft blog hop. I hope you have as much fun as I did creating these “soft” and adorable bunnies. Bonus…you get to also check out all of these other amazing “soft” crafts by my fellow bloggers. You’re going to love them! Check out each of their links in green below!
Julie ♥ Sum of their Stories ♥ Upcycled Sweater Easter Gift Bags
Gail ♥ Purple Hues and Me ♥ Loopy Yarn Lamb Treat Jar
Christine ♥ Christine’s Crafts ♥ DIY Hair Towel Wrap
Marci ♥ Stone Cottage Adventures ♥ DIY Cozy Weighted Warmer
Allyson ♥ Southern Sunflowers ♥ No Sew Drop Cloth Bunny Pillow
T’onna ♥ Sew Crafty Crochet ♥ Crochet Tabby Cat
Julie ♥ Treasures Made From Yarn ♥ Stash Buster Blanket
Mel ♥ Decor Craft Design ♥ Upcycled Bottle Vases With Soft Spring Colors
Niki ♥ Life as a LEO Wife ♥ Farmhouse Chunky Yarn Wreath for Spring
Aren’t these all so fun? This is my third month to participate in this Sustainable Craft Challenge and I just love everything about it. I have found myself focusing on items I throw away and thinking about how I can use it for something else instead. Last month’s challenge found me diving in very seriously to the other blogger’s posts and creating some very fun new crafts!
Happy Crafting My Friends !
Love Mimi

Amazon Associate ~
This post and its photos may contain affiliate links. As an Amazon associate I earn from qualifying purchases. If you make a purchase through these links, I may receive a small commission at no extra cost to you!

