A Grandma's spin on crafts, games, recipes & lifestyle

Tag: yummy

Hearty Personal Breakfast Skillet

If you are anything like me, you are always searching for new and exciting recipes.  Sometimes, those recipes can be similar to ones you have already made, but you need only to change up the method in which you serve them!  Through the years I have heard people say, “Why do you worry about so many small details?”  My response is always…”Presentation is Key!”

This very topic is what helped me to discover personal-sized cast iron skillets.  I love cooking with the small skillets both for presentation and to have the ability to cater to each individual’s personal preferences in foods.  These Hearty Personal Breakfast Skillets are a big hit on Sunday mornings in our family.

Which Skillets to Use ~

There are so many wonderful skillets out there, however, we tend to lean toward the Lodge brand.  The benefits of this brand are as follows:

  • Retain heat well
  • Preseasoned
  • Can be used on stovetop, in oven, on grill or over an open fire
  • Lifetime warranty
  • Long-standing history of quality products
  • Can be used for everything from frying to sauteing, to broiling and everything in between
  • Have a large variety of sizes and different series
  • Easy to find locally and on-line

Size to Use for Hearty Personal Breakfast Skillet ~

We use the Lodge Pre-Seasoned 6-1/2 Inch Skillet for the breakfast skillet as well as many other individualized recipes.  It is a good idea to have 6 to 8 if you are planning on serving several people.  I use them many times for just Brad and I as well, so if you are empty nesters, it is fun to get 2 and have fun creating!  *Pay close attention to the size because many brands have an even smaller size that is not big enough for this savory dish!

What is even better about these is that you can create savory or sweet recipes in them.  Who doesn’t like digging into a steaming hot personal pan brownie or cookie topped with ice cream?  Yum!  These have quickly become known as pizookies!

Recipe ~

Ingredients for 6 Personal Skillets:
  • 14 Red potatoes, cubed small
  • 10 Sausage patties, crumbled
  • 6 Ham slices, cut into small squares
  • 1 Small Onion, diced
  • 2 Bell peppers, color(s) of choice, cubed
  • 2 Anaheim peppers, diced
  • 12 – 14 Eggs
  • 1/2 to 3/4 Cup Milk
  • Salt
  • Pepper
  • Montreal Steak Seasoning
  • Shredded cheddar cheese

*Please note, you can customize these ingredients to your liking.  Other topping ideas:

  • Mushrooms
  • Spinach
  • Mozzarella, Swiss, Gruyere, Fontina, Gouda or your favorite cheese of choice
  • Tomatoes
  • Bacon
  • Avocado
  • Black Olives
  • Jalapenos
  • Hash Browns
Directions for 6 Hearty Personal Breakfast Skillets ~
  1. Brown sausage.  I used patties because that is what I had on hand.  (You can, of course, use any type as you will be crumbling it after cooked.)
  2. While sausage is cooking, continue chopping the rest of the veggies and ham.
  3. Cook chopped potatoes, onions, and peppers until browned in a separate small skillet.                   
  4. Layer sausage and ham in prepared 6 1/2″ skillets.                                                                                         
  5. Follow with cooked potatoes and veggies.                                                                                               
  6. Season liberally with Montreal Steak Seasoning and then salt and pepper to taste.
  7. Beat eggs with milk until completely combined.
  8. Pour egg mixture over meat and veggies in each skillet.                                                               
  9. Top with desired amount of cheese.  (We love cheese so I completely cover the skillet.) 
  10. I placed each skillet on foil lined baking sheets to protect oven from spillage.
  11. Bake at 350 for 45 minutes or until browned.

*You can exclude necessary ingredients to create a Keto version.

Want To Top It With Gravy? ~

Let’s take it a step further and add gravy.  You can go the traditional route and make gravy from scratch or you can make it from a mix.  I use Pioneer Country Sausage Gravy Packets when not making gravy from scratch.  Season it up with salt and pepper and it becomes the perfect final topping for this delicious recipe!

Make Ahead ~

Holiday season is upon us.  Chop up all of your ingredients ahead of time for prep and put together early Christmas morning.  Put your coffee on and assemble these before the Christmas present frenzy begins.  While you are all opening presents, this delicious breakfast can be cooking and filling the room with scents of a cozy Christmas morning!

If you are in a pinch for time, put it all in one large skillet to scoop out individual servings when ready!

Serving Choices ~

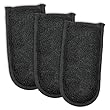
As you can imagine, the skillets are extremely hot when taking out of oven. I love to serve these yummy dishes with quilted handle covers for functionality and to keep the presentation fun!  Basic Black Set of 3 Skillet Handle Covers are a good place to start for your collection!

Of course, these fun bandana ones are adorable for many occasions as well!  Are these not the cutest???

Bandana Hot Handle Holders by Lodge

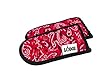
Crafty Hands Primitive has a large assortment of colors to choose from to match any season/holiday/theme you wish.  Be sure to look at the beautiful patterns by CraftyHandsPrimitive on Etsy by clicking here!

Primitive Skillet Handle Pot Holder choose fabric image 2

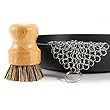
Care of Iron Skillets ~

I had never cooked with an iron skillet until I got married.  Brad quickly taught me the beauty of using them, but even then I shied away from them because I was unsure how to care for them.   I soon realized that they truly are very easy to clean.  This is all you need to clean your cast iron skillet:

Stainless Steel Scrubber Set

What’s even better is that this fun idea has come to you just in time for Christmas.  Whether adding them to your Christmas wish list or surprising someone special, a set of single-serving sized iron skillets will be sure to bring a smile to anyone’s face!  Soon I will bringing you a cookbook featuring a variety of iron skillet recipes just like this delicious hearty breakfast skillet!

Happy Cooking ~

Mimi


Cheesy Scalloped Potatoes that are Ahhh…mazing!

You may already have a scalloped potato recipe that you love.  However, do yourself and your family a favor and give this recipe a try!  Then once you try it, please come back and let me know if it is the new family favorite.  This recipe has been handed down through my family for years, and I decided to be very nice and share.  These, my friends, are cheesy scalloped potatoes that are ahhh…mazing!

It’s been a family debate over whether we should share special recipes.  One common belief is that if you keep the recipe secret everyone looks forward to you  bringing that special dish to family gatherings, right?  While this is indeed true, I am here to attest that your are still thought of when someone else makes your recipes.  I can’t tell you how many times I have made a special dish and stated to everyone, “Now you guys are going to love this because it is so and so’s famous recipe!”

Helpful Tips ~

There are a couple of different secrets I am going to share with you.  Mainly, just because I’m a nice gal! 😏

  1. This recipe is best if you cut the potato slices thicker.  You may be asking yourself, “If I make them thick, how can I ensure they will get done all the way when baking?”  There, my friend, is the first secret.  You need to parboil your slices.  Parboiling can be tricky because if you overcook them they will get too soft.  I truly can’t give you a specific amount of time needed because it depends on how many potatoes you are using.  I use the old fashioned fork test.  After about 5 minutes of boiling, I consistently and gently poke one of the potatoes with the fork to see if it is slightly soft.
  2. You are going to cook the sauce over the stove and then pour it over the potatoes in 2 layers.  Many people just layer cold cheese, however, by making a sauce you are creating a much more flavorful and saucy potato dish.
  3. Timing everything while cooking is one of the hardest things to learn for new cooks.  Once you put your potatoes on to parboil, you should start your cheese sauce.

How to Make Cheesy Scalloped Potatoes ~

Ingredients ~
  • 10-15 Medium Sized Russet Potatoes – sliced thick
  • 32 Ounce Block (2 lb) Colby Cheese -cubed
  • 2 Cans of Cream of Mushroom Soup
  • 2 Cans Milk (using cream of mushroom soup can)
  • Salt & Pepper – to taste
Directions ~
  1. Preheat oven to 350°
  2. Peel and slice potatoes.                                                                                                                                                   
  3. Parboil sliced potatoes for 10-15 minutes.  Check for softness with fork starting at about 5 minutes.  The time needed will vary according to thickness of potatoes.  You want them to be slightly soft.
  4. While potatoes are boiling cut cheese into cubes.                                                                   
  5. Mix cheese cubes, soup and milk in pan.  Cook over medium heat until completely melted, stirring occasionally so mixture doesn’t burn.                                                                                                                                                   
  6. Spray a 9 X 13 casserole dish with cooking spray.
  7. Drain potatoes.  Place half of cooked potatoes in casserole dish.
  8. Top with half of cheese mixture and salt and pepper to taste.                                                                 
  9. Layer remaining potatoes on top of cheese mixture and then top with remaining cheese.  Sprinkle again with salt and pepper to taste.
  10. Bake for 45 minutes to an hour.  We like ours with the cheese browned quite a bit so I bake it for the longer amount of time.
More Tips for those Cheesy Scalloped Potatoes that are Ahhh…mazing ~
  • If your casserole dish is filled to the top, place it on a foil lined baking sheet to catch spillage of cheese as it melts.
  • Since parboiling potatoes can be tricky to get the perfect consistency, I always insert a fork into my casserole when done to ensure they are completely cooked through.  If they still seem a bit hard but your top is browned, put foil over them and bake for 15 minutes or so longer.
  • Since you are parboiling the potatoes, there is no reason to cover with foil when first baking.  However, see bullet above for example of when you may need foil.

I get requests to make this recipe ALL THE TIME.  I sometimes feel like I should stop making them for awhile because I don’t want people to get bored with the side dishes.  However, they just keep requesting them.  This alone tells you how awesome they really are!

Also, if you are thinking that your family may not like them because it is Cream of Mushroom soup, stop thinking that right now.  If it is that big of an issue just don’t let them know what is in it.  I promise you that once you make that cheese sauce, they will have NO idea!

What’s even better is that these potatoes can be paired with so many different meat items.  In fact, they would go awesome with the Smoked Poor Man Burnt Ends that I wrote about…see that by clicking here!  Heck, there are times we warm them up the next day (that is IF there are any leftovers) and have just potatoes for dinner!

As always, good food keeps people coming back….so be sure to give this one a try!

Printable Version of Cheesy Scalloped Potatoes that are Ahhh…mazing ~

These cheesy scalloped potatoes are a family recipe that has been handed down for years.  It has a special ingredient that you don't see in most cheesy potato recipes.  This will quickly become your family's favorite go to for scalloped potatoes!

Happy Cooking ~

Mimi

Frozen Fruit Yogurt Bites

Finding snacks that are just as much fun to make as they are to eat can be challenging.  While our frozen fruit yogurt bites did not turn out exactly as anticipated, Addi, Max and Mimi had lots of fun in the kitchen and still enjoyed the end result.  This post is a tad different as I will fill you in on the right way to make these….and the wrong way! 🤣

I am notorious for just “winging it” in the kitchen.   The kids used to sit and watch at the kitchen island and marvel at how I just added a little of this and a little of that.  They have now learned that as you get more comfortable in the kitchen, it becomes easy to guesstimate while cooking.  However, sometimes one should really follow the directions.

Frozen Fruit Yogurt Bites Ingredients ~

  • 1 Cup Plain Greek yogurt
  • Handful of Frozen fruit of choice
  • 1 tsp. Honey (or more to taste)
  • Spinach (let’s get real sneaky!)

Directions ~

  • Place frozen fruit and honey (and spinach if you choose to add) in blender to puree.  We love our Ninja Personal Smoothie Blender… it makes smoothies so much easier to make.  By using the personal size, each person can choose their own fruit flavors.  Check it out here➡➡➡ Ninja Personal Smoothie blender – we LOVE it!

  • Scoop the puree into a bowl and add 1 cup greek yogurt.  Stir until well mixed.
  • Pour the yogurt mixture into a baggie (or a piping bag if you have one).  I definitely suggest a zip type baggie to alleviate any future messes.

Of course, even with a zip type baggie you can still get leakage out of the top if it isn’t sealed well.  Oh well, at least this is a recipe that is safe to eat even before you freeze!⬇⬇

  • Put in freezer for 3 to 4 hours or until solid.  These will melt fairly fast, so be sure to have them completely frozen before enjoying.

Very Important Tips ~

***Do not add water when making the puree.  This is the first step I messed up on.  I told Addi to add water to her cup to make the puree process easier.  Instead, we should have let the frozen fruit thaw a bit and NOT add water.  By adding water, the mixture came out runnier than it should have been! 

***Puree completely as small chunks will create a hole in your bag later….which you do NOT want!

***Greek yogurt helps with the consistency.  

***Let the kids use a whisk to blend.  They enjoy that so much more than a spoon and it blends better.  We started out with a spoon and switched once we realized it wasn’t mxing well.

***When letting kids help, as I highly recommend that you do, be prepared for the fact that you may not get “dots” as you originally intended.  That is ok!

***Add that spinach….it will make a very fun green color frozen yogurt bite and yet the kids won’t realize it’s coming from spinach.  Unless of course, you let them take part in the puree step as the spinach should be pureed with the fruit and honey.

End Result ~

Ok, so ours did NOT end up in the cute little button style.   I realized very early on that this step was not going as planned.  So, I put on my big girl panties and said to myself, “That’s ok!”  Afterall, isn’t learning in the kitchen part of this whole process?

Seriously, look at that determination in his face.  Who cares that they weren’t perfectly formed.  They still taste the same.  It was time for a little improvision.

We smeared that stuff around and decided to cut little squares instead.   This way, they got to use Addi’s new kid-safe kitchen knife that I talked about for her birthday post.  Did you catch that post?  If not, check it out here as I showed several great kitchen tools for kids….Great ideas for kids in the kitchen!

Does it look like she cared that her yogurt bites weren’t in the button shape?  Who can resist the happiness in that face?

Quick and Easy Version ~

While it is so much fun to create your own flavors, there is an easier version.   Using store bought Go-Gurts , snip off a small corner as mentioned earlier(do not use the precut pull tab they provide).  Proceed to squeeze small dots on wax paper and freeze until solid.  This is quick and easy!

These frozen fruit yogurt bites are a big hit with the kids and adults alike.  Everyone chooses their favorite flavors.  You can get creative and mix different fruits to make new fun flavors.  Have fun and enjoy!

Hugs ~

Mimi


Velvety Potato Leek Soup

What a tantalizing soup to serve with salad and a sandwich or just a crusty piece of bread!!!  Make it lunch or dinner….just MAKE it!   Blend the sweet delicate flavor of leeks with potatoes to create this creamy soup.  Velvety potato leek soup will quickly become a family favorite!

Have you cooked with leeks before?  They are a member of the onion family and look like a very large green onion.  Leeks add a mild yet sweet flavor to any dish.  You will, however, need to take time to clean them as dirt and grit get caught in the layers easily.  It is best to clean them by cutting off the end and then slice in half length-wise from root to top.  Pull the layers of the onions apart and run each under the water to clean thoroughly.

Velvety Potato Leek Soup Ingredients ~

  • 1 Stick Butter
  • 2 Medium Leeks (sliced)
  • 1 Medium Onion (diced)
  • 3 Green Onions (diced)
  • 5 Russet Potatoes (peeled & sliced or cubed)
  • 32 Ounce Chicken or Vegetable Broth
  • 1 1/2 tsp. Thyme
  • 3 Cloves Fresh Garlic (minced)
  • 2 Cups Heavy Cream
  • Salt & Pepper to taste

Directions ~

Melt stick of butter in stock pan. Add sliced leeks, green onions, garlic and onion to pan.  Saute over medium heat until vegetables are translucent (be careful not to brown).

Add potatoes, thyme and broth and bring to a boil.  Reduce heat to medium and simmer until potatoes are softened (about 20-25 minutes depending on thickness of potatoes).

Using a food processor or immersion blender, blend about 3/4 of the soup until it is pureed.  *You can puree the whole batch, but I prefer to leave a small portion of it a bit chunky.  If you are using a food processor, ladel portions at a time to the processor depending upon the size of your processor bowl.

Return puree to pot and add heavy cream.  Season with salt and pepper to taste.  Cook over low heat until heated through.

Garnishments ~

  • crumbled bacon, bacon and more bacon!!!
  • shredded gruyere, parmesan or cheese of your choice
  • sprinkle of cayenne pepper
  • chives
  • cracked black pepper

Notes ~

You can omit the heavy cream or substitute half and half for a more low-fat version of velvety potato leek soup.  The soup will still have a creamy texture to it as the pureeing process creates a creamy a nice cream consistency.

Slice or dice the potatoes to your preference.  Whichever method you choose, you will not want them to be real thick or it will take longer for the potatoes to soften while cooking.  The picture belows shows slices, but I actually prefer dicing the potatoes.  Small chunks of potatoes give a nice texture for that 1/4 of the soup I do not puree.

Don’t let the idea of pureeing turn you away.  This soup is super easy to make and is well worth that extra step.  I love my Ninja.  Get your Ninja Mega Kitchen System Here!

  • Includes: 1500-Watt Motor Base, 72-Oz. Total Crushing Pitcher, 8 Cup Food Processor Bowl, Dough Blade, (2) 16-Oz. Nutri Ninja Cups with To-Go-Lids

As mentioned earlier, you can also use an immersion blender instead.  Check out the immersion hand blender here!

  • Hand-held immersion blender for mixing soups, sauces, smoothies, and more

Both of these gadgets have numerous benefits, you only need to decide which one works best for you!  In fact, maybe you already have one of these.  MAYBE, you have it tucked away and haven’t used it in a while.  Do me a favor, get it out and use it for this amazing recipe!

Serve this luscious soup with a leafy green salad or a side of pasta salad.  Add  some crusty bread that is great for dipping for a hearty and cozy dinner.  What’s even better is that this fun idea is coming to you right before St. Patrick’s Day.  Afterall, it is also called Irish Potato Leek soup!  Enjoy!

Happy Cooking ~

Mimi (Shelly)


Homemade Sausage with Fennel

Pappy on the Penarve is at it again….this time making homemade sausage with fennel….AH…MAZING!!!!!  He has been perfecting this recipe for quite some time, and the end result is worth all of the work.  Let me tell you, there are quite a few steps to the end result…but oh is it worth it!!  That being said, it would be a great idea to purchase quite a bit of meat to work with so you can store some for later!  By doing this, it makes the time spent making this delicious sausage even more worthwhile!

In our recipe a KitchenAid mixer with the meat grinder attachment is used.  I absolutely love my KitchenAid and use it for so many different recipes.  Check out the Black Storm KitchenAid Professional Series Mixer ~ it is a FANTASTIC addition to any kitchen!

There are, of course, other great meat grinder options:

This electric meat grinder gets great reviews…check it out here!

This manual meat grinder has a suction base and gets great reviews…check it out here!

These grinders work for so much more than just making sausage.  I grew up with my mom making homemade ham salad.  We still put in requests for her secret recipe to this day!  Yes, I said secret!  And yes, that recipe will be coming soon so stay tuned!

Back to the Homemade Sausage with Fennel ~

As stated earlier, buy the pork shoulder butt in bulk.  When we find it on sale, we go hog wild….yes, pun intended! 🤣  The savings you will notice will astound you!

What you will need ~

  • The fattest pork shoulder/butt you can find…seriously buy that fatty stuff!
  • Fennel seed – if you are like Brad (Pappy), you will want an abundance of this!
  • Salt
  • Pepper
  • Garlic Powder
  • Red Pepper Flakes (optional)
  • Red Wine or cooking wine (we used a nice Cab)
Step 1 ~

Cut the pork shoulder/butt into chunks for grinding and place in a disposable foil pan.

Step 2 ~

Cover the meat with foil and move to the freezer to get to a cold state.  This helps the grinding process go much smoother.  Brad kept it in the freezer for about 1 hour.

Step 3 ~

Grind the meat chunks.

Step 4 ~

Generously season the ground pork shoulder/butt.

Step 5 ~

*After completely blending, make 1 or 2 small patties.  Fry these patties for tasting.  This is an important step before moving on!  This will enable you to decide if it is seasoned to your liking.  If you are preparing meat to store for later use, you will want to be sure you are happy with the flavor.

Step 6 ~

Add additional seasoning if you prefer.  Cover ground meat and place back in freezer for about an hour.

Step 7 ~

Remove from freezer and prepare your mixer for the final prep stage of your homemade sausage with fennel.  *If you don’t have a mixer with sausage stuffer capabilities, you can make it into patties.  We actually prefer to make different types of sausages for various serving options.  When using the sausage stuffer, it is helpful to watch videos first to aid in the process.  I have provided a link from KitchenAid.com right here ~  Use this handy link from KitchenAid to view how to use the sausage stuffer attachment!

If you are making into patties, there are many options on that process.  I prefer rolling the sausage out and using a glass or biscuit cutter to be the best option for more uniform patties.  However, sometimes we just form them with our hands as we did in the picture above.  If you choose to roll out it, there are different methods, I like the method that HappyMoneySaver.com uses here ~  Happy Money Saver describes the rolling out and cutting process in detail here!


Freezing Homemade Sausage with Fennel ~

We love the Food Saver Vacuum Sealer for so many freezer foods.  It does such a great job protecting food from air and freezer burn.  It is also ideal for food prep.  You can double so many of your recipes and save half of them for later, making busy nights or lunch time woes a cinch!    Get your own Food Saver Vacuum Sealer here…you will love it!

Like so many kitchen gadgets, you may ask yourself, “Will I really use this?”  From experience, this is one gadget we are very happy to have and we find ourselves using it often.

We will use this sausage for breakfast and dinner ideas.  Our favorite is grilled sausage with peppers and onion served with a side of rice.  However, we will definitely be looking for new fun ideas to use this yummy sausage as well.


Meal prep has become widely popular for busy families and lunch preparation.  This homemade sausage with fennel is an ideal recipe for just that!  Not to mention the savings you will see.  For this recipe we bought almost 10 pounds of pork for $9.  Seriously $9!  The amount of sausage links it yields (depending on how big you choose to make each one) is phenomenal!

I hope you enjoy this recipe as much as we do!  Let us know in the comments below!  Also, follow MimiBlog with the link and you can stay up to date with all the great recipes!

Have a great week!


%d bloggers like this: